Organic farming Manure & Fetlizers & Bio-Stimulants
In organic farming, manures, fertilizers, and biostimulants are natural inputs that enhance soil health and plant growth. Manures, such as farmyard manure and vermicompost, are organic materials that improve soil structure and fertility over time by releasing nutrients and boosting microbial activity. Organic fertilizers are derived from plant and animal waste, slowly releasing essential nutrients for plants. Biostimulants are natural substances (like humic acids or seaweed extracts) or microorganisms that stimulate natural plant processes, improving nutrient uptake, root development, and stress tolerance without directly supplying nutrients themselves.
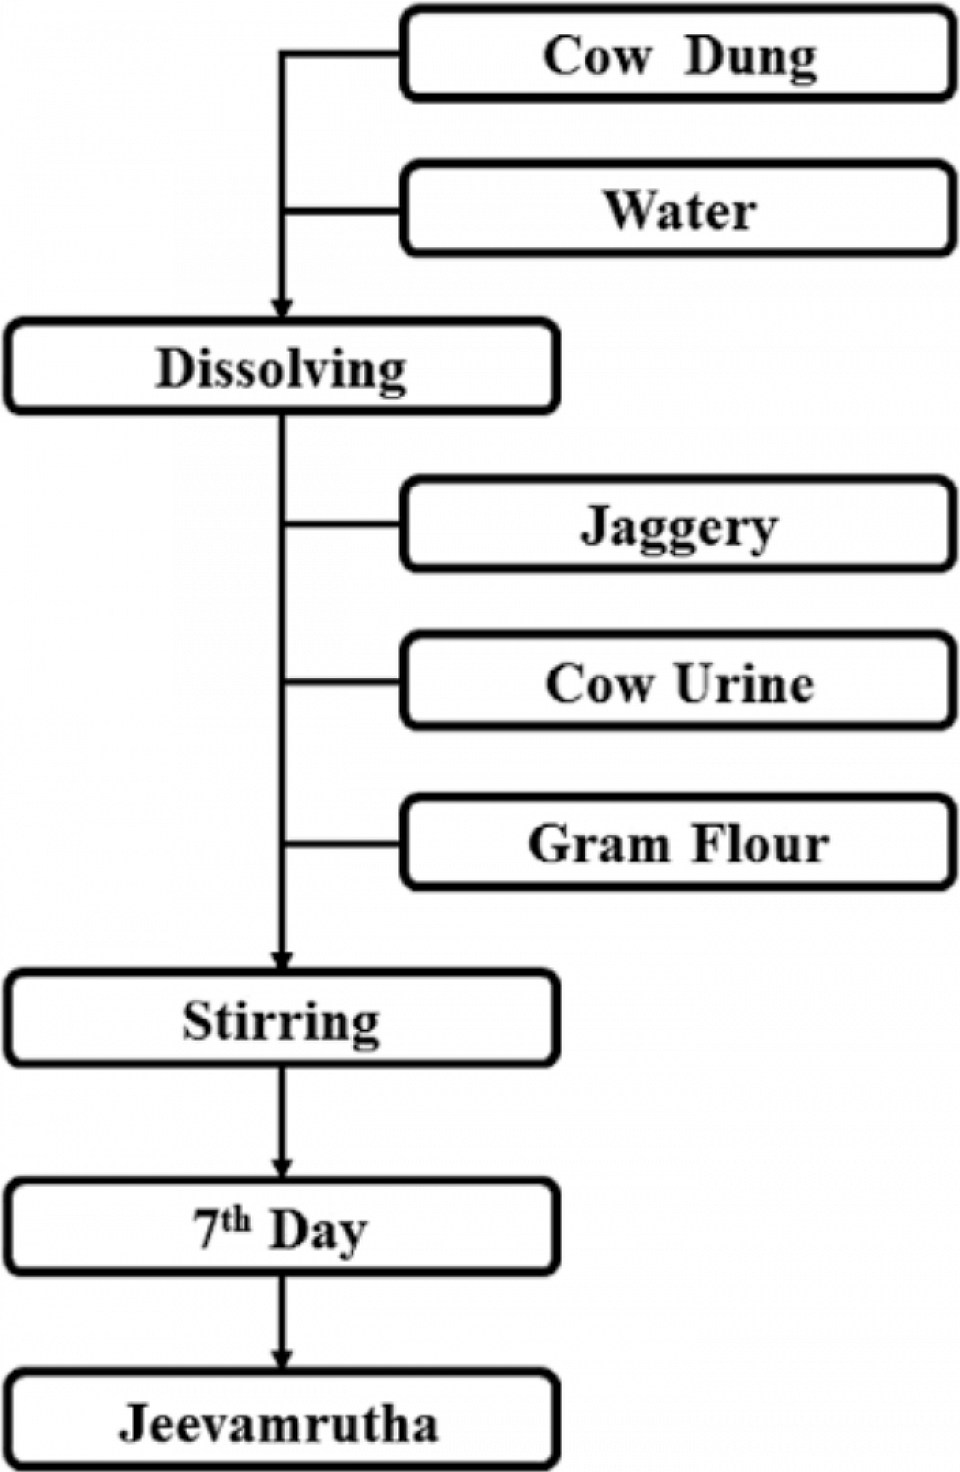
Jeevamrutha Details & Preparation
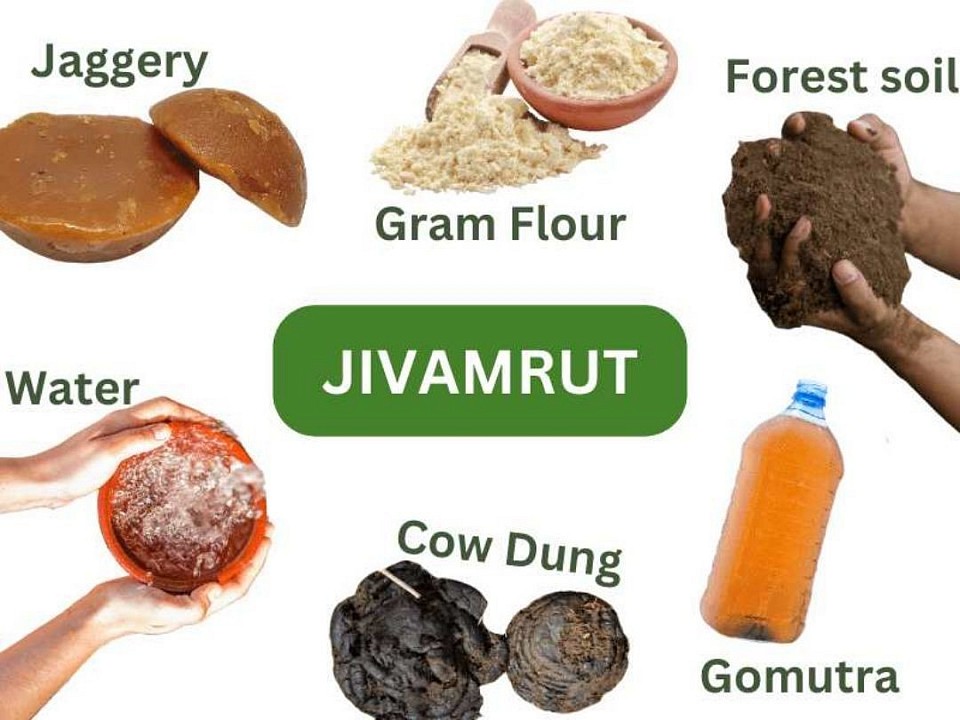
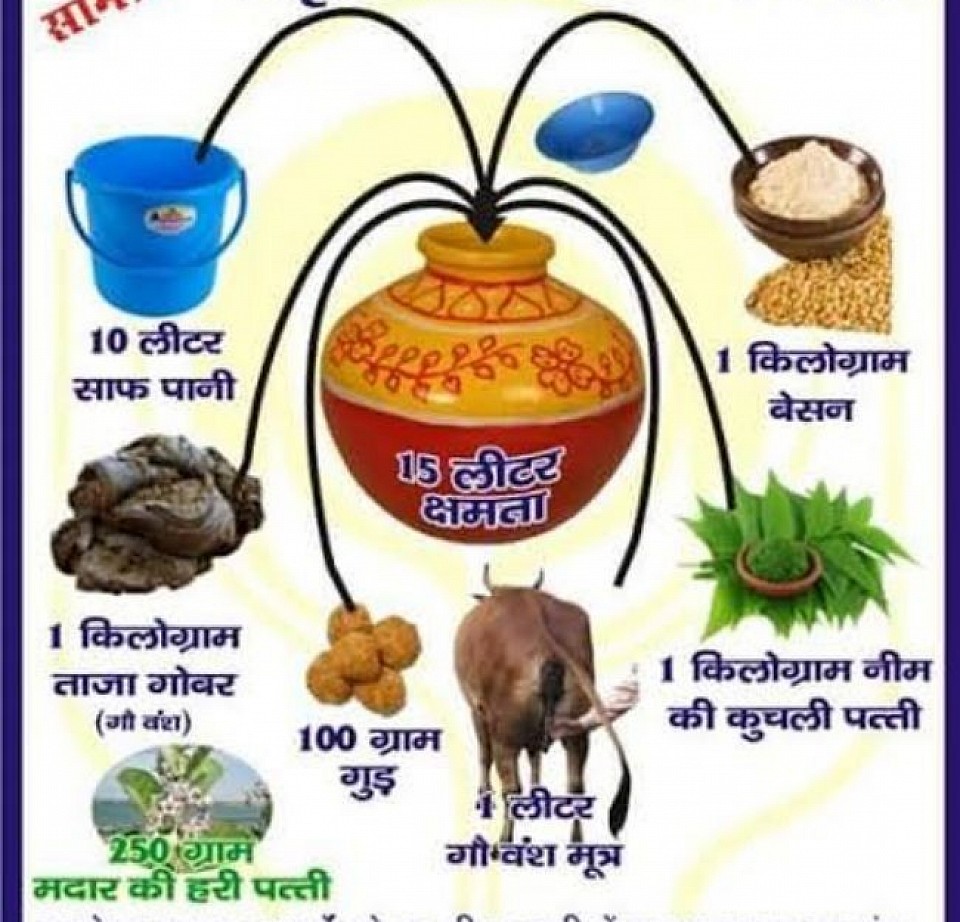
To prepare Jeevamrutha, add 200 liters of water to a container and mix in 10 kg of cow dung, 5-10 liters of aged cow urine, 2 kg of jaggery, 2 kg of pulse flour, and a handful of fertile soil. Stir the mixture well, cover it with a wet gunny bag or cloth, and let it ferment in a shady spot for 48 hours to 7 days, stirring it clockwise twice daily. This creates a nutrient-rich liquid fertilizer teeming with beneficial microorganisms that enhances soil fertility and plant growth.
Ingredients
- 200 liters of water
- 10 kg of fresh, local cow dung
- 5-10 liters of aged cow urine
- 2 kg of local jaggery (brown sugar)
- 2 kg of pulse flour (e.g., gram flour, chickpea flour)
- A handful of fertile soil from the farm's bund
Preparation Steps
Combine Ingredients: In a clean 200-liter capacity barrel or drum, add water and then all the other ingredients: cow dung, cow urine, jaggery, pulse flour, and a handful of soil.
Mix Thoroughly: Mix all the ingredients well using a wooden stick to ensure they are well incorporated.
Ferment: Cover the container with a wet gunny bag or cloth and place it in a shady, cool spot.
Stir Daily: Stir the mixture vigorously in a clockwise direction twice a day (morning and evening) for 48 hours to 7 days, depending on the temperature.
Ready for Use: After the fermentation period, the Jeevamrutha is ready.
Uses and Application
Application: Dilute the prepared Jeevamrutha with water (e.g., 1 liter of Jeevamrutha to 4 liters of water) and apply it to the fields through the irrigation system or as a 10% foliar spray.
Benefits: Jeevamrutha acts as an organic fertilizer, increasing the microbial count and friendly bacteria in the soil. It also enhances soil fertility, improves the quality of grains, and increases earthworm populations, which helps in improving the soil's structure and water-holding capacity.
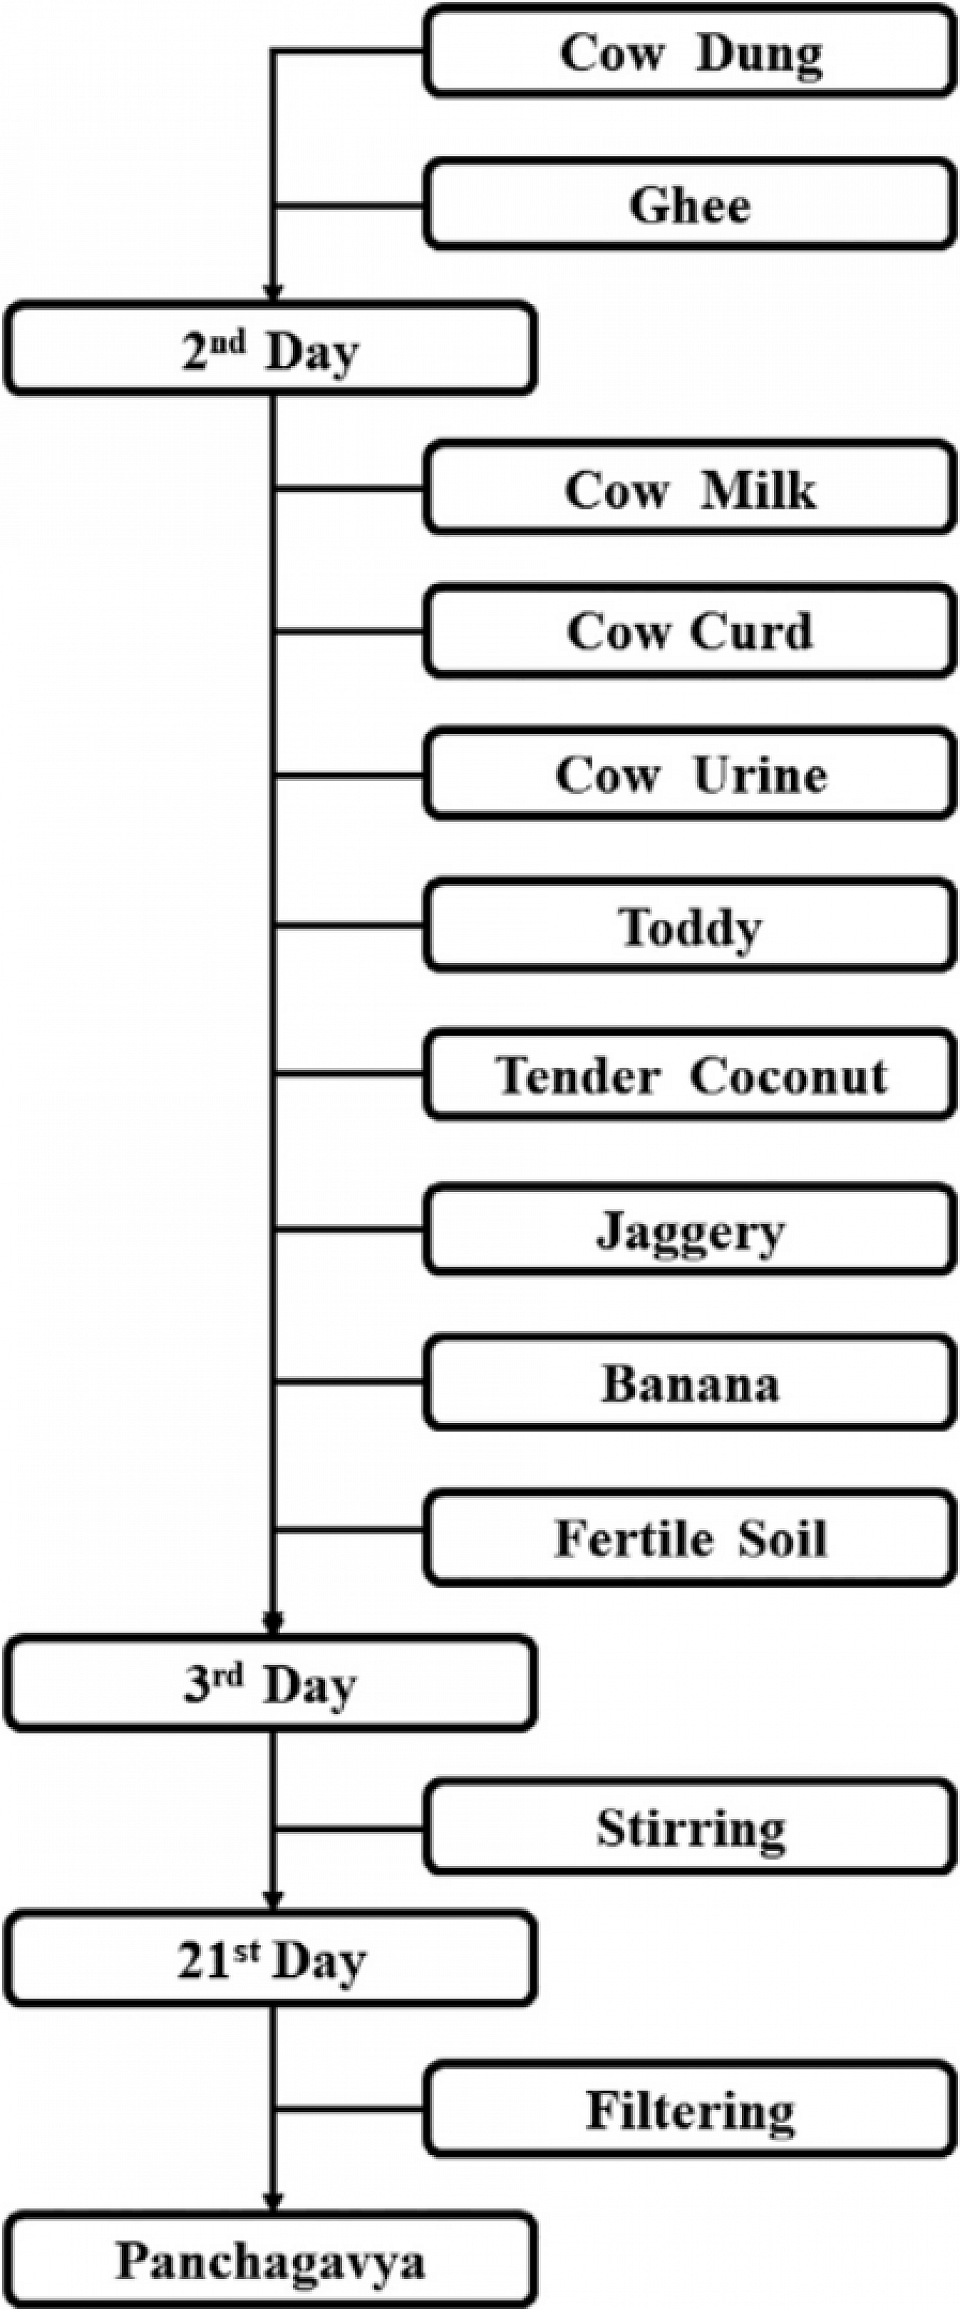
Panchagavya Prepration & Details
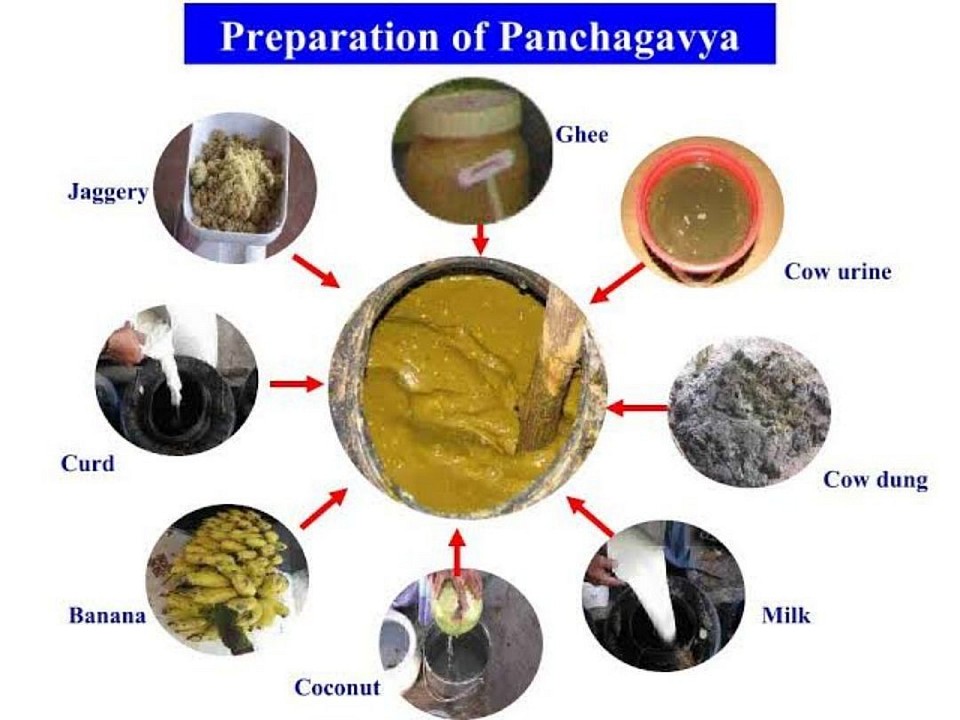
To prepare Panchagavya, a traditional mixture used in organic farming, you combine cow dung, cow urine, milk, curd, ghee, jaggery, tender coconut water, and ripe bananas in a wide-mouthed container. The mixture undergoes a fermentation period of 15-30 days in a shaded area, with regular stirring twice daily to facilitate the process, after which it is diluted with water and used as a liquid fertilizer.
Ingredients
The traditional recipe for Panchagavya includes the following ingredients:
Cow dung, Cow urine, Cow milk, Cow curd, Cow ghee, Jaggery, Tender coconut water, Ripe bananas, and Water.
Preparation Steps
Mix initial ingredients: Begin by mixing fresh cow dung with cow ghee in a wide-mouthed container like a mud pot or plastic barrel.
Ferment the first mixture: Cover the container with a breathable cloth and allow this mixture to ferment for three days, stirring it twice daily.
Add subsequent ingredients: After three days, add cow urine, cow milk, curd, tender coconut water, jaggery, and ripe bananas (mashed into a paste) to the container.
Ferment the complete mixture: Stir the mixture well and cover the container again. Continue to stir it twice daily for a period of 15 to 30 days.
Finalize the product: The Panchagavya is ready after the fermentation period is complete. You can sieve the liquid to remove undissolved solids and store it in a cool, dry place.
Key Considerations
Container: Use a wide-mouthed container made of mud, concrete, or plastic.
Fermentation: Regular stirring is crucial to aid the fermentation process and prevent sedimentation.
Storage: Store the prepared Panchagavya in a cool, dry place.
Smell: A properly prepared mixture should have a pleasant, toddy-like smell, not an unpleasant sewer-like odor.
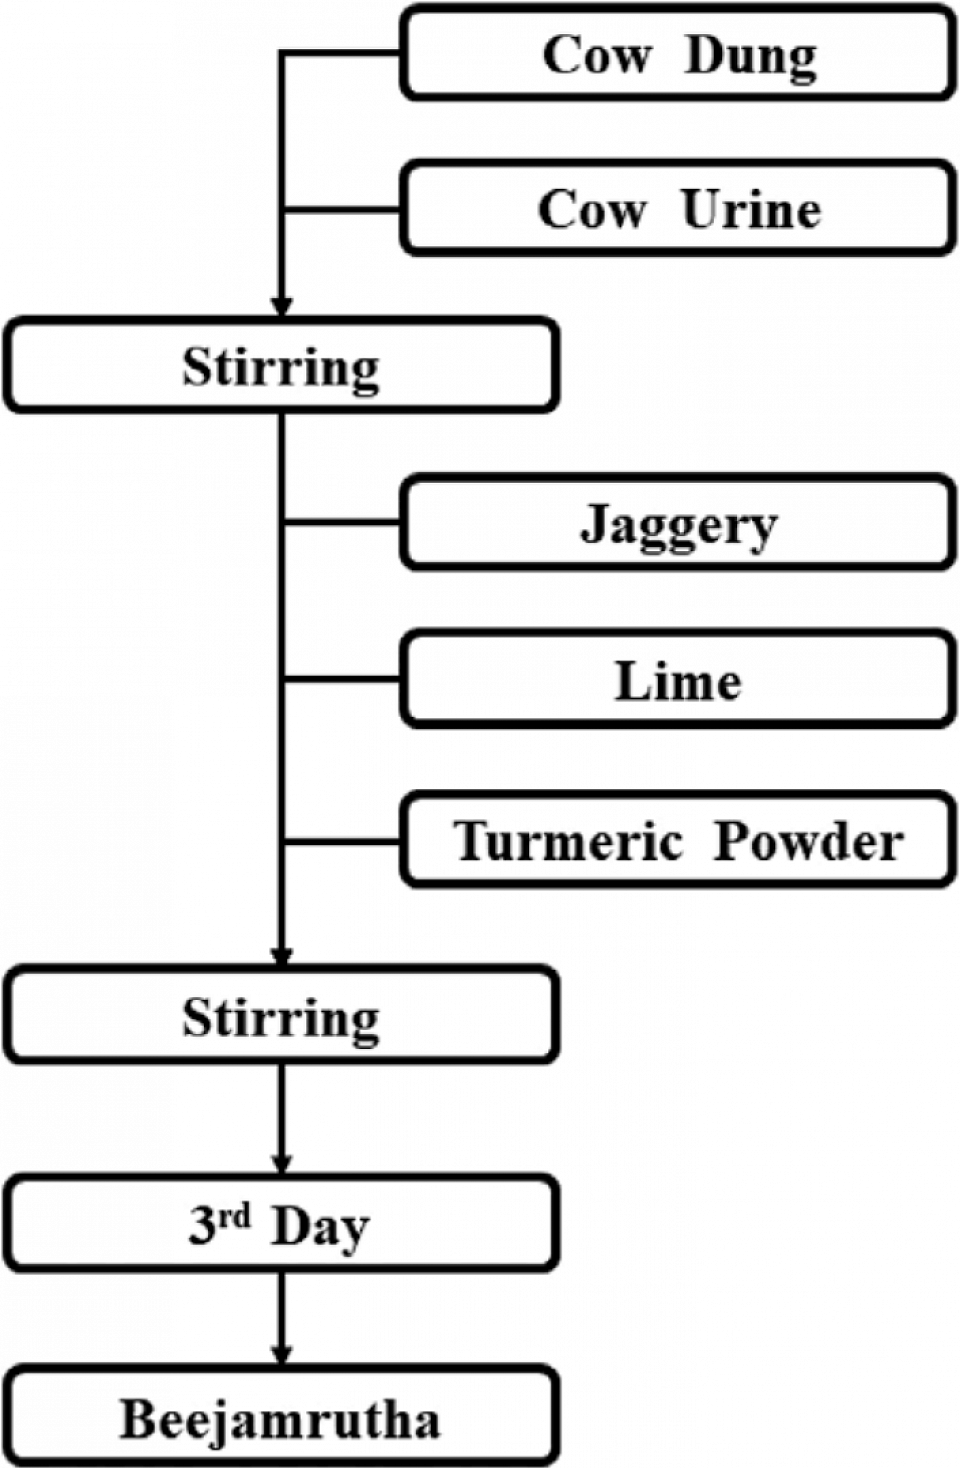
Beejamrit Details & Prepration
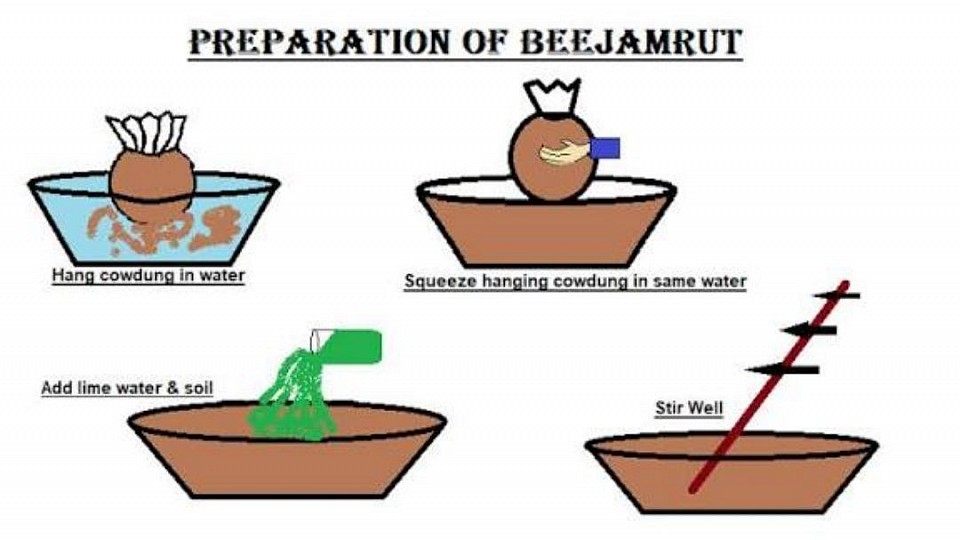
To prepare Beejamrit, mix 5 kg of fresh cow dung, 5 liters of cow urine, 50-100 grams of lime (or calcium chloride), and a handful of forest or ant hill soil with 20 liters of water. Soak the cow dung in water for 12 hours, then squeeze it into the mixture with the other ingredients and stir well. Allow the mixture to ferment for 24 to 48 hours before using it to coat seeds or dip seedling roots.
Ingredients
Fresh desi cow dung: 5 kg
Desi cow urine: 5 liters
Lime: (or calcium chloride): 50-100 grams
Virgin soil: (from forests or ant hills): A handful (approx. 50-100 g)
Water: 20 liters
Preparation Steps
Prepare the cow dung bag: Place 5 kg of fresh cow dung in a thin cloth and tie it.
Soak the dung: Hang the bag in a bucket containing 20 liters of water for 12 hours.
Prepare the lime solution: Dissolve 50-100 grams of lime in 1 liter of water and let it sit overnight.
Combine the ingredients: Squeeze the cow dung bag thoroughly into the bucket of water to extract its essence.
Add other ingredients: Stir in 5 liters of cow urine, the handful of virgin soil, and the prepared lime solution.
Ferment: Stir the mixture thoroughly and allow it to ferment for 24 to 48 hours.
Application
Seed treatment: Coat the seeds with the Beejamrit mixture by rubbing them gently in your hands.
Drying: After coating, dry the seeds in the shade before sowing.
Root dipping: For seedlings, you can dip their roots into the Beejamrit mixture before planting.
Benefits
Protects seeds and seedlings from soil-borne and seed-borne pathogens.
Enhances germination, seedling vigor, and root growth.
Improves nutrient and water uptake by plants.
Promotes overall crop performance and yield.
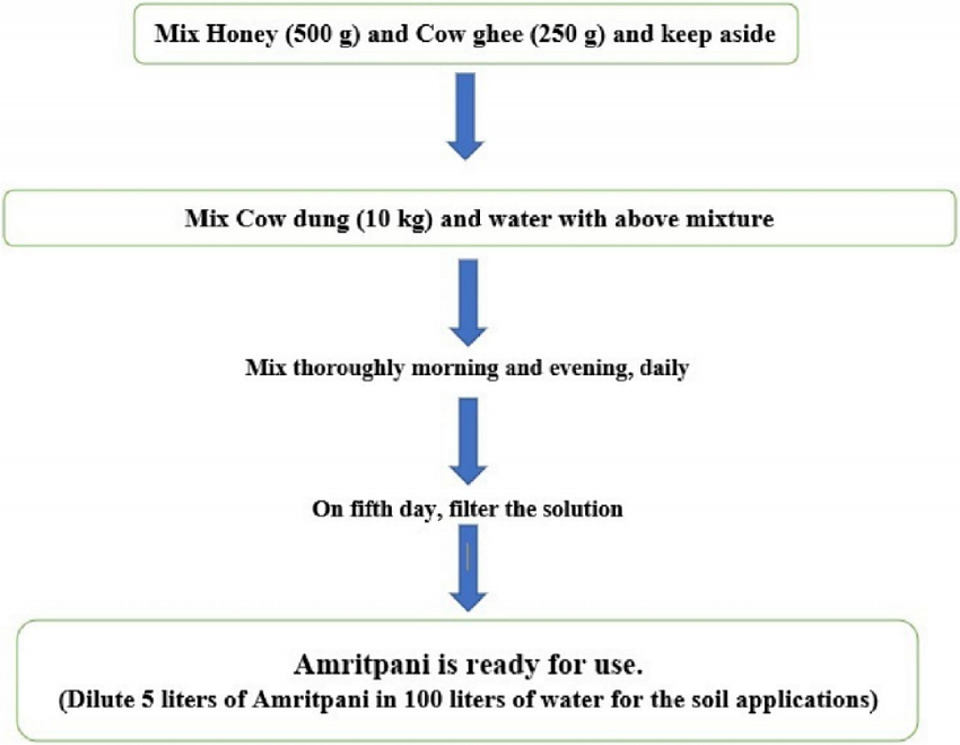
Amritpani Prepration & Details
Amritpani is an organic liquid preparation used to enrich soil and boost plant growth, made primarily from fresh cow dung, cow urine, jaggery (or molasses), and water, with alternatives to cow products suggested for some methods. The preparation involves mixing these ingredients in specific ratios and allowing them to decompose, either for a short period for immediate use or longer for a more potent mixture. The resulting liquid can then be filtered and sprayed on crops to improve soil fertility and plant health.
Ingredients (General)
Cow Dung: Fresh dung is the base material.
Cow Urine: A source of nutrients and beneficial microbes.
Jaggery/Molasses: Provides a source of energy for the microorganisms.
Water: Used as a liquid base and for dilution.
Optional additions: Some methods suggest using chickpea flour, neem leaves, or other plants to enhance the preparation.
Preparation Steps (Example based on a common method)
Mix the Base: Combine fresh cow dung, cow urine, jaggery, and water in a suitable container. For example, 10 kg of cow dung and 10 liters of cow's urine, with 1 kg of jaggery and 100 liters of water.
Blend Thoroughly: Stir the mixture well with a stick or by hand to ensure all ingredients are thoroughly mixed.
Ferment: Seal the container in a cool, dark, and dry place.
Allow to Decompose: Let the mixture sit for a period, typically from a few days to a month, allowing anaerobic fermentation to occur.
Filter and Use: After the fermentation period, the liquid can be filtered to remove solid particles and then diluted with water for spraying on crops.
Application
The filtered Amritpani is sprayed onto crops using a pump.
It serves as a bio-enhancer and can improve plant growth, yield, and quality.
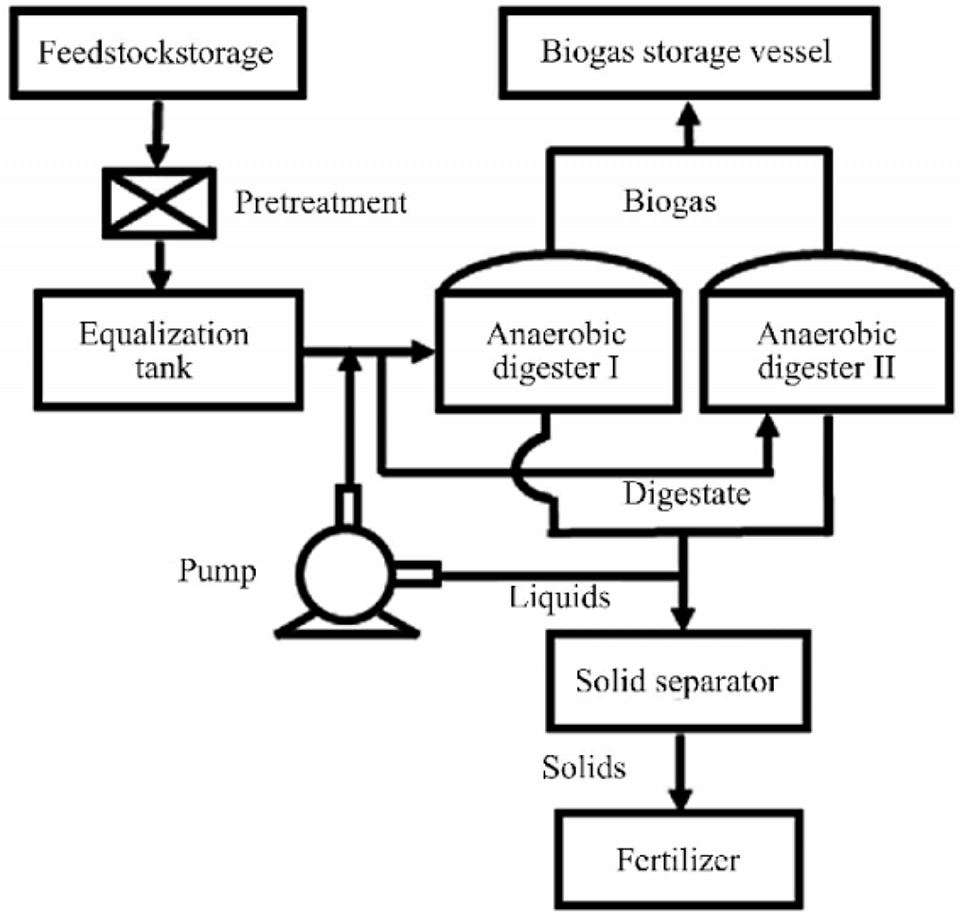
Bio-Digester Details & Prepration
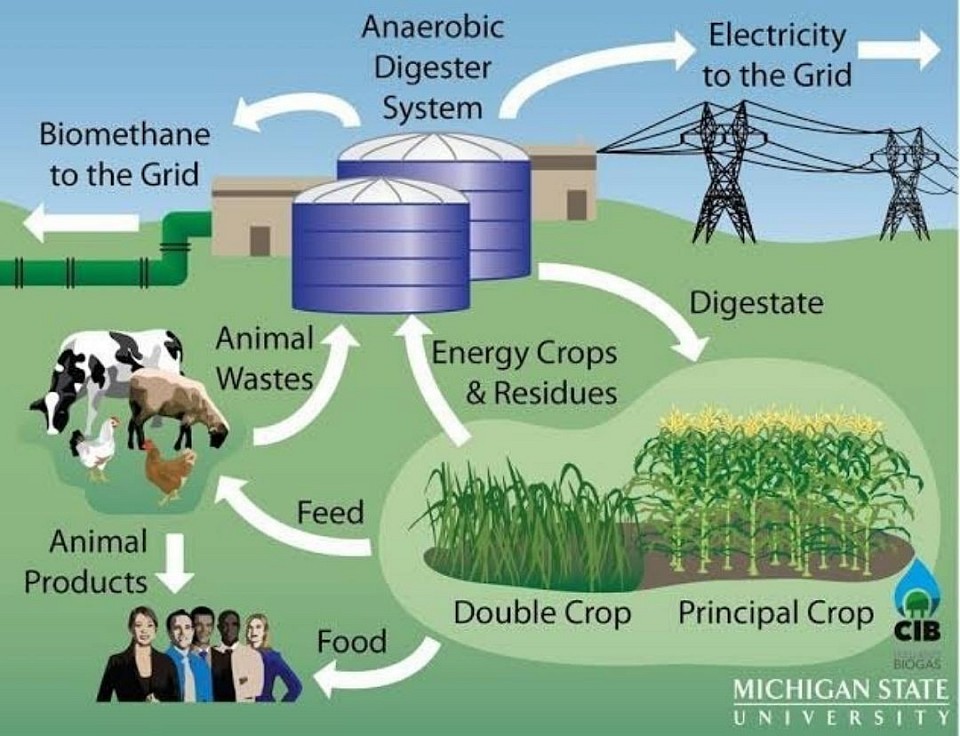
To prepare a bio-digester for agriculture, mix fresh animal dung with water (ideally a 1:1 ratio) and inoculate it with a starter culture, like cow dung and water, to introduce necessary anaerobic bacteria. The digester must be in a suitable location that maintains an optimal temperature, and the organic waste needs to be fed regularly to maintain consistent biogas production and create a nutrient-rich digestate (fertilizer).
1. Select and Prepare the Digester
- Site Location: Choose a sunny spot that offers protection from strong winds and potential flooding.Temperature: The digester needs an optimal temperature range, typically 20-40°C, for the bacteria to thrive.
- Proximity: Consider the distance to your source of organic waste (feedstock) and where you will use the biogas.
2. Gather and Prepare the FeedstockOrganic Waste: Collect organic materials such as animal dung, kitchen scraps, or agricultural waste. Pre-treatment: Shredding the waste into smaller pieces increases the surface area for bacterial action, improving the efficiency of the digester.
Mixing: Mix your organic waste with water to create a slurry. The ideal ratio is often 1 part waste to 1 part water, but some systems use different ratios for optimal slurry consistency.
3. Inoculate the DigesterStarter Culture: The first step in preparing the digester is to introduce a "starter" culture of anaerobic bacteria. Cow Dung Solution: A mixture of fresh cow dung and water (about 1:1 ratio) works well as an inoculant.
Retention Time: After inoculation, allow the system to sit for a period, typically 12-15 days, to allow the bacteria to establish themselves and begin producing gas. 4. Feed and Operate the DigesterRegular Feeding: Once the initial gas production begins, you should add new organic waste and water regularly to maintain the process.
Continuous Process: The incoming new waste pushes the older, digested material out of the system.
Monitoring: Continuously monitor the digester to maintain optimal conditions and ensure consistent biogas production and a steady output of liquid fertilizer (digestate).
5. Utilize the Products Biogas: The biogas produced can be collected and used for cooking, lighting, or even generating electricity.
Digestate: The remaining liquid, called digestate or bio-slurry, is a nutrient-rich fertilizer that can be directly applied to agricultural fields for crop production